
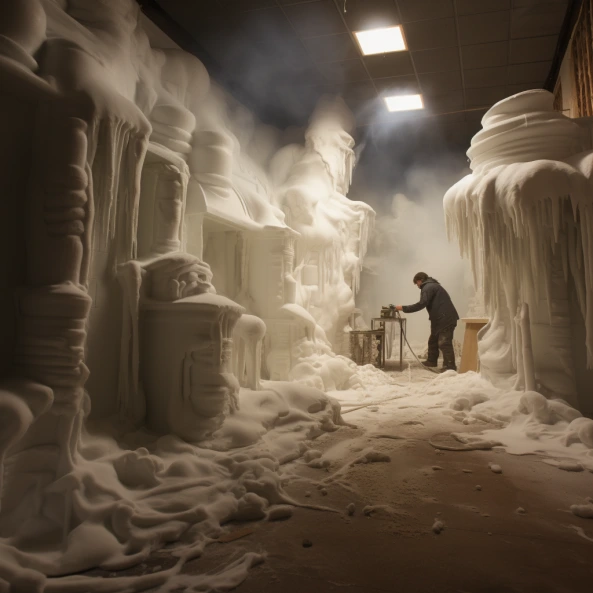
Need some rocky props for a play or movie set? Want to add some rugged landscaping to your yard on the cheap? Craft your own faux boulders from spray foam insulation! With some carving and painting, you can mimic the craggy textures of real rock formations.
Foam’s Faux Stone Potential
Spray foam seems an unlikely material for mock rocks. But its texturability and sculptability make it surprisingly ideal:
- Foam can be carved easily when cured using common woodworking tools.
- The soft material won’t quickly dull blades like real stone.
- Foam is lightweight compared to solid rocks for easier handling.
- Its density prevents brittle edges or cracks during detailing.
- Paint and finishes adhere well to give a stony appearance.
- Any mistakes are fixable by reshaping foam before final detailing.
Big-screen set designers and clever DIYers have crafted some incredible faux geology from simple foam.
Prepping the Base Foam Shape
Start by building up base shapes with these foaming options:
Spray Foam
Standard DIY spray foam kits allow you to spray free-form shapes right in place. Just mask off surroundings carefully first! Slow, patient passes build up naturalistic forms.
Open Cell or Closed Cell Spray Foam?
When selecting a spray foam for faux rocks, closed-cell foam is preferable to open-cell foam. The denser structure of closed-cell foam allows for sharper detail when carving to mimic realistic rock textures. It’s less prone to absorbing moisture which can cause ballooning or collapsing of the foam when painted. Closed-cell’s higher R-value also provides better insulation if you need the projects to be functional instead of just decorative. The higher rigidity helps edges and details hold their shape better through carving and handling as well. Just be sure to select a closed-cell foam that is rated as non-structural, so it’s easy to carve. With the right closed-cell foam, you’ll be able to carve out some incredibly convincing fake rock sculptures.
Purchase a kit directly from us for your next movie set or prop needs.
Foam Blocks
Cut or glue together blocks of rigid foam insulation, carving large shapes roughly. Adhered shards make craggy edges.
Expanding Foam Sealant
Controlled blobs and lines of sealant foam can construct smaller rock details.
Chicken Wire/Mesh
This forms an armature to spray over, adding surface texture.
Carving Convincing Crags
Here’s how to chisel charming chasms:
- Let foam fully cure first so it’s solid. Impatient carving risks collapsing.
- Use stiff bristle brushes to stipple the surface before carving.
- Sketch out rock texture designs first with a marker.
- Cut deep recesses with a hot wire foam cutter.
- Shape layers and ridges using a serrated blade reciprocating saw.
- Add cracks and crevices with a rotary tool and small round burr bit.
- Take off chunks and spikes for rough areas using an oscillating saw.
- Hand chisels make nice fine details like flakes or crystals.
- Avoid over-detailing small areas. Think “impressionistic”.
Priming and Painting Pro Tips
Sell the illusion with strategic colors and shading:
- Fill any major gaps or imperfections with foam filler first.
- Prime all surfaces with textured masonry primer to start with texture.
- Drybrush shades of gray first, accenting ridges and contours.
- Add tan, brown and yellow tints in light coats to mimic dusty, eroded stone.
- Paint recessed cracks and holes black first for depth. Highlights make them pop.
- Use sponges and rags to stipple and blot color for a mottled look.
- Mist layers of clear matte coat sealant to protect the finish.
- Tack on lichen flakes and moss tufts for an aged, weathered vibe.
Setting the Scene
Integrate your crafty creations into convincing environments with these tips:
- Bury bottom edges into mulch or soil to mimic emerging from the earth.
- Allow some overhanging sections for a natural look.
- Stack flat-edged pieces to build up faux cliffs.
- Add realistic joint filler “grout” between adjoining rocks.
- Scatter gravel, roots or plants around to fill the scene.
- Insert dowels in the foam underside for stability in stands.
- Hide any seams or joints with moss coverings.
Creating an Entire Scene
Here are some other movie props and set pieces that could be made using spray foam:
- Fake trees/shrubbery – Build up realistic trunks, branches, and foliage.
- Mock stone walls – Sculpt foam to emulate stone blocks, bricks, etc.
- Faux cave formations – Create stalactites, stalagmites, and realistic cavern textures.
- Fabricated furniture – Lightweight foam couches, chairs, beds for sets.
- Ornate moldings – Shape elegant crown molding, ceiling medallions, columns.
- Brick or stone walkways/walls – Make lightweight sidewalks or fortress walls.
- Boulders/cliffs – Sculpt rugged rocks and mountainous terrain.
- Ruins and rubble – Simulate fallen stone architecture and textures.
- Special effects pieces – Animate parts, add interesting shapes.
- Props/weapons – Swords, armor, shields, chalices.
- Set exteriors – Build fake storefronts, houses.
- Textured ground cover – Grass, dirt, stone for miniature sets.
The diversity of shapes and textures that can be carved out of cured foam make it a “blank canvas” for infinite prop possibilities. With some creative vision and etching tools, foam can mimic almost any material.
With creative carving and cunning paint techniques, your foam rocks will have audiences convinced! Harness the power of foam faux stone for your next theater, art or DIY project.